Showing posts with label Art Journal. Show all posts

Sunday, June 12, 2022

My Art Featured on Art Group - Bloom Where You Are Planted

      I'm a member of a prompt related art group on Facebook called The Mixed Media Emporium with Nina Ribena & Kylie Coo. 

     The group has over 10,000 members and out of those 10,000 members my art was chosen for a special honor and picked to be the masthead of the group page for the 4th week of April, 2022. 

     Everyone in the group congratulates you and it really helps to inspire you to work hard to continue to create artwork that people love.


     I am so honored to have my art featured, here's the art page I did that was chosen. This is a page in my art journal. 


     This is a two page spread that I made for my homemade art journal. The art journal is made out of a recycled Fruit Roll-Ups Box, covered with fabric and the decorated, it's a whole process and I may do a blog post for it another time. 

     What we do in this group is called Mixed Media Art, anything and everything is fair game. In this piece I used leaves cut out from an box of tissue paper, here's a picture I found online of the top of a box. Once I cut out the leaves, I peeled off several layers so the leaves would not be so thick. 


     I took a page out of the art journal (the pages are removal of ease of use). The page I decided to use already had the background on it. It's what we call a "mop up" sheet. As I am doing other projects I have a sheet of paper either underneath to protect my desk or sometimes to the side and I clean off my paint brush, or try paint colors, so eventually it's got a beautiful blend of colors, in this case I felt it had a bit of a jungle look to it. So I started gluing the leaves around the top and bottom of the page to make a border. 

     I added a flower I had made following another YouTube channel and started gluing the sentiment "Bloom Where You Are Planted" and then added butterflies, because I love butterflies!

     And that was it. I was surprised that something so simple to create was worthy of the honor of being the masthead, but hey, I'll take it!

     Not to toot my own horn, but "toot-toot" this is actually the 4th time my artwork has been chosen. You can check out the first time HERE, second time HERE, third time HERE


Sunday, June 7, 2020

Jack of All Trades....Master of None

One recurrent theme on my blog is the quote, "Jack of Trades, Master of None." I've always loved this quote and feels it applies perfectly to me and the life I've led. 

The complete original quote is, "A jack of all trades is a master of none, but oftentimes better than a master of one." Being the Master of One just doesn't suit me.  

My blog has never been about one thing. It's not a cooking blog, even though I have pages and pages of recipes posted. I've done table-scaping posts, book review posts, low-carb lifestyle posts, Iwanna Wednesday posts and writing prompts. I've just dabble in a little of this and a little of that.

Am I just easy bored and restless and fly from flower to flower taking the best of each one? Or am I more interested in learning many things rather than specialize in just one? Hmm, I don't know. I think I would say that I am just evolving. 

At one time this blog was the love of my life, what I looked forward to the most. I love words and writing, always have, always will. It's what I come back to time and again, whether it's writing on this blog or writing in a journal, which I've come to do more and more.

But back on May 3, 2016 I found a new passion in ART. I attended a Wine and Paint class as part of a group celebrating the birthday of a friends daughter. While the wine was fantastic, it was my own artwork that amazed me. You can read that post here

Here's a photo of me with my first true artistic creation. Look at the smile on my face...you would think I had just painted The Mona Lisa!


Since then I've been creating art of some type. But true to my nature, I'm a Jack of All Trades and Master of None. 

I started with sketching.

Ballet Shoes


I've done Impasto Art with a palette knife.


I've painted on canvas with Acrylics.


I've done Art Journaling.


Staying true to form I'm moved on to something new that I want to share and  archive on my blog for my son and daughter to look back on someday when I'm old and feeble and just want to sit in my wheelchair and yell at the politicians on TV. Then they can remember that their mother was an Artist, a Writer, A Jack of All Trades, Master of none but she had passion.

Zentangle is my latest passion. For those that have never heard of Zentangle (I know I had never heard of it), Zentangle is an easy-to-learn, relaxing and fun way to create beautiful art by drawing structure patterns called tangles. Tangles are created using a combination of dots, lines, simple curves, S-curves and orbs. You can find more information about Zentangle here

My life was turned upside down on March 18, 2020 when the Governor of California, Gavin Newsom issued Executive Order N-33-20 which directed all individuals living in the State of California to "shelter-in" and stay home except as needed to maintain continuity of operations of federal critical infrastructure sectors. Our world as we knew it descended into something we had only seen in movies or read about in books. 

The management team for the company I work for told us at 2 pm that day to shut down our computers, pack them into our cars and take our little butts home to begin sheltering-in and working from home, until further notice. That's what we did and that's what I've been doing since that date. In a few weeks it will have been four months since I have been working from home, venturing out into the world only to purchase essential items such as food and home keeping supplies. 

Needless to say all of this weighed heavy on my heart and mind because I am the Head of Household. My mother lives with me, my son and daughter both still live at home and while they don't realize it, I feel as though they were looking to me to keep them safe and fed and sheltered. 

Thank goodness I own my home and don't have a mortgage, I kept my job and my pay exactly as before so my lifestyle didn't really change except for the fact that I had/have no life. I work at home, I eat at home, I sleep at home...I don't leave home. If I do venture out or if any of my people venture out I've had to make sure that we all wore masks and gloves and use hand sanitizer and wipe everything down with disinfectant wipes. 

How did we get from being a Jack of All Trades and Zentangle to talking about COVID-19 aka the Corona Virus? Well I found that I lost my will to be creative because I was so stressed out. I really had nothing concrete to worry about but yet I had everything in the world to worry about. I would see on the news where elderly people were dying alone in hospitals without their family by their sides because they were in quarantine and I feared that happening to my own mother. I couldn't let her get sick and die alone, no-how, no-way! 

Everyday was something new. At first I was comforted by the fact that the virus was by-passing young people, but then all of a sudden there would be a report that it was killing young people. Some days you would hear the virus is on surfaces, then next day it was only airborne. You couldn't count on anything so you had to take ALL the precautions and this was super stressful. 

Luckily one day I stumbled on a new a "Stay at Home Zentangle Class" by a YouTube artist Hannah Geddes. Here's the first video:

I was amazed how something that looked so complicated and beautiful could be so easy and I has hooked, I had to learn Zentangle and I started Hannah's classes. 


I just started and didn't really research anything about tangling or Zentangle, but I learned as I went along. I learned from Hannah to slow down, to concentrate on the lines and to breathe and I found that even though the world was still in chaos, I was able to calm my mind and help myself to be more at peace and to sleep through the night again. I've been doing Zentangle ever since, soaking up all the different patterns and watching several other CZT's or Certified Zentangle Teachers. I've been having a great time.

I watch her do each design and then I have been using Index Cards that I've cut down to 2 1/2 inches by 2 1/2 inches. Once I make them and get used to the tangle, I've been gluing them into a simple composition book that I've been using as an art journal, writing journal and tangle journal when COVID-19 began. Here's some of my earlier ones from weeks 1, 2 and 3. Each Tangle has a name given to it by it's creator.

DIVA DANCE


NZEPPEL


ENNIES


EMINGLE


MEER


Here's a few that I did today. These were just for fun, not part of Hannah's class.


MESHMERIZE


DIDN'T WRITE DOWN NAME OF THIS ONE...SORRY


THIS HAS SEVERAL DIFFERENT TANGLES


So anyway, this has gotten to be a rather long post and it's almost time for me to prepare for bed and work again in the morning. We are supposed to be back in the office on June 22nd, barring any further drama and chaos...wish me luck!


Friday, September 13, 2019

Featured on Art Group!

You guys remember when I started on my Art Journey? It was May of 2016, so it's been more than three years now and I've been pretty consistent in doing art of some type.

Am I getting any better? Well, there's some improvement, especially in my drawing skills. I'll have to share some more artwork in the future.

For now I just want to document an honor that I've been give in one of the art groups I'm in. The Art group is called Nina Ribena's Art Journal Prompts and More. Each Sunday we are given an art prompt and then we can run with it. One person's art is chosen to be displayed on the groups masthead. This week it was mine, here it is. I was thrilled when I saw mine was chosen as there are such fabulous artists in this group!


This Sunday the prompt was to Reuse/Recycle/Repurpose. We had to use just scraps and bits of paper and stuff we already had. I have an art journal that I made using a cereal box and scraps of paper, I'll have to post about that later.

So I did this two page spread using acrylic paint for the background, then scraps of a pink paper I had used on a different project to cut out flowers. The leaves are made using what we call "painty paper" a very technical terms which means we just use left over paint and put it on random papers which we keep to use later, nothing goes to waste! I did some doodling on the flowers and leaves and then used a lettering method called "wavy letters" for the quote.


So just wanted to share this little gem so I have it somewhere forever. Maybe this weekend I can find time to photograph the scraps journal, it's so stinking cute! Thanks for reading!


Sunday, September 9, 2018

Art Journaling Update

I'm really looking forward to Autumn and cooler weather. It's been so hot that it's just taken the wind out of my sails when it comes to painting, but I'm happy that I've found an outlet in Art Journaling.

Here's a page I did today. I needed something bright and beautiful after my Dallas Cowboys lost to the Panthers. I'm hoping they do better in the rest of the season, but they did inspire some beautiful art work. C'mon Cowboys...turn into butterflies!


This is almost an art journal, even though it's a rock. Sometimes I miss Arizona and I was inspired by one of those kind of days to create something that reminded me of Arizona. Arizona's beautiful sunsets, there is nothing more beautiful!


Last weekend I did this one and it was so much fun! The background was from a sheet of script paper that I purchased at Hobby Lobby for $1.00. It was 12 x 12 inches so I still have some left. The flowers and leaves I drew and then painted on old book pages and then cut them out and pasted them on the page. Same with the birds and the branches.  This one took a while, but I didn't even notice the time, it flew by because I enjoyed doing this so much.


I did this one last weekend also, same technique, old book pages. I never thought of making art with old books, but I love it!


As soon as the weather changes and it gets cooler, I hope to get back to painting on canvas with acrylics, don't worry cousin Stella, your owls will be the first thing I do! I have the background done already.


Friday, September 29, 2017

Using Dollar Store items for Art - Art Journal Prompts and Focal Points

I’ve joined a group on Facebook that does weekly Art Journal Prompts. I joined the party late and missed prompts 1 thru 30, but I can go back and do the ones I want or just keep going with the new ones.

The prompt comes out on Sunday and this week’s prompt was “Use 3 Colours”.  We could do anything we wanted, using only three colors.  Nina Ribena is our fearless leader and she announces the prompt and includes a YouTube video with her version of the prompt. Here is her fabulous video.


I love her videos because they are very informative and professionally done. I learn lots of new methods and how to use various products, and also because I love her voice. It's very calming.

She suggests that we choose three colors from the focal point that we are going to use. I had some napkins that I bought at The Dollar Store that had a beautiful stacked cup design on them. I’d seen quite a few people use napkins as a collage and figured it was time to try it.  

I did this page several months ago, experimenting, not knowing what I was doing. The napkin part is the flowers, music and butterflies. As you can see, lots of wrinkles. But using the prompts allows me to grow and get better and I hope when you see my finished product you will see the big difference.


Always remember that Google is your friend and YouTube your best friend! I googled "how to iron a napkin to card stock using plastic wrap" and found several videos. I chose this one as it was very easy to understand. 


It worked beautifully, not a wrinkle to be seen. I then chose my three colors from the napkin, peach, blue and an orangy brown (rust) color. For the background, I used my gelatos which are like a water color crayon. You can color with it and activate it with water and a paintbrush or you can just blend with your fingers. I love using them, always get great results!

Once dry, I used Mod Podge to glue the image to the background.  and then brushed Mod Podge over the whole image and background which lays a clear protective glaze over it all. 

I was so anxious to finish it and post it to the group Facebook page that I decided that instead of printing the quote at the office the next day and then cutting out the quote and pasting it, I would just hand write it. 

I need practice with hand writing as I think I went a little nuts with my curlicues, but all in all I loved it the minute it was finished and I posted it to several art groups on Facebook, including the Art Journal Prompts group.


I received so many comments on this page so I thought I would share it here as well. See how much nicer the cups look? No wrinkles. Love it! Hope you do as well

By the way, here's a fabulous website if you want to learn more about Mod Podge or just pick up fabulous ideas. Mod Podge Rocks


Wednesday, September 13, 2017

Dead Men Tell No Tales and some Zombie Fish!

Wow, it's been a while since I've done a post. I've actually started a couple but they seemed dark and sad with my thoughts on all that is going on in our world and that's not normally me. I like to keep it light and happy, because in all truth, this is my happy place.

When I start writing about things I'm excited or happy about it keeps me in a good mood. So I'm going to put all thoughts aside for a few moments on all that is going on in our world and just share some of my artwork.

I've said before, I'm late to this "art thing" and I wish I had realized earlier how much I would grow to love it because I would have started sooner. But, I'm making the best of it now. This coming Monday I start up with my art classes again and I can't wait! The instructor Alex is awesome at encouraging us to do what we feel in our heart. Last year I was a total newbie, but this year I have a little bit more experience under my belt and with his guidance I hope to grow even further.

Because the weather has been just one degree cooler than the surface of the sun, I have not been painting as much with acrylics. It's just too hot! So I've continued doing my mixed media art journal paintings. I've joined a Facebook group that gives a weekly prompt. The Admin for the group posts the prompt, along with a photo of her page and a YouTube video of her process in creating the page. It's a great way to learn new techniques and she's amazing.

This week the prompt was "The Sea". She did a great page with a Seahorse. She used modeling paste to make the ocean bed and some additional paste in the part that would become the ocean. I followed her direction as far as that and then went off on my own interpretation of the sea, which turned into a pirate with a treasure chest and a pint of ale, some zombie fish and a steam punk seahorse.


This was completed in 3 days as I took my time and you have to when you have that much modeling paste layered on. I really love it. It's hard to see all the shading and details, but the treasure chest coins have been painted gold and then I added glitter, which is not noticeable at all in this photo.

What you can see is the texture the modeling paste created at the bottom of the page. It made all those bumps and waves that make it look like the bottom of a sandy ocean. In the sea part you can see how using texture there made the paint go on in layers of white, light blue, turquoise blue and dark blue. I used those colors in acrylic paints and added them with a simple foam makeup pad that I purchased in a pack from The Dollar Store.

So that's what I've been up to. It's been keeping me sane with all the craziness in the world. What do you do to de-stress? What's your happy place?

Alicia~

Friday, August 18, 2017

Being Chaotically Creative with a Credit Card and Still Staying On Budget!!!

Want to know my secret for using a credit card and not getting into debt? How to use a credit card and still stay within budget? How to use a credit card and not have it affect your credit score? Well stick around because I am about to share my secret with you! The secret to my financial success. Here it is, are you ready for it?


Do you see it? Do you see the secret to my success in staying debt free by using a credit card? That's right! Don't use the credit card to make purchases, use it to paint! 

Righto...that Mixed Media Journal Page above was painted using only a credit card. No brushes, sprays, sponges or salad spinners!!! Just a credit card.

I know, I tricked you! And even now I am tricking you because I didn't use an actual credit card, I used a gift card that no longer had any cash on it. 


Started with a blank multi media page and dotted some paint on it in purple, pink and white and used the credit card like a palette knife and spread the paint around. Not evenly, let some white show, blended the colors, just had fun with it!

Let it dry and then used the credit card to make lines, slashes, rectangles and squares. The only time I did not use a credit card was when I used scissors to cut out the shape of the feathers and I used a small bamboo skewer to glue the feather shapes together. I then painted the feathers, again using the credit card and used scissors to cut the fringed feathery parts. A bit of glue to attach them to the page and then added my page title: CREATIVE


The purpose in doing this? Just to show that you don't need a bunch of fancy art supplies to create beautiful art. This was just simple craft paints which you can purchase at Walmart for 59 cents a bottle and imagination...oh and scissors!

These are great exercises in learning to let go of fear of messing up, or being too precise or too (as I am) obsessive about things having to be perfect. I do plan to get back into my acrylic painting, as soon as the weather cooperates and it gets below 90 degrees, currently as I type this it is 99 degrees. I can't wait for fall already!!!


There are so many other ways to be creative and artistic without spending a lot of money on supplies. One of my favorites that I've seen online is an artist that uses fruits and vegetables to create dresses on the models that he first hand sketches. He also uses other household items. Here's a YouTube video of his art that I hope you will watch and enjoy.


So that's it for now, hope you enjoyed my credit card art and remember the best way to stay out of credit card debt is to use it for art!

Alicia

Monday, July 24, 2017

Arizona Plant - My Art Journal Inspiration

My latest Art Journal Page...


There are several different medias and techniques on this page, let me share some of them with you.

First of all I'm using a Canson Mixed Media ring-bound notebook. I love this because you can use almost any media on it, pencil, pen, markers, acrylic paints, watercolor, ink sprays, glues, almost anything!


My inspiration was the plant in my front yard that I call the Arizona Plant. I've blogged about it before and you can find that post here. But here's the picture I had in front of me while I create the page. I would love to say that I'm a great photographer but it's the flower itself that makes the picture.


I was also inspired by a YouTube video by Nina Ribena where she uses a Salad Spinner to create art! Yep, you heard it here...a salad spinner, one of these! In fact this is the exact one I have that I bought several years ago and use all the time.


Here's the video in case you want to see how it's done. I wish I had thought to take pictures of the samples that I made, but I can at least show you what I made out of them and how.


So I made two discs like the ones above, one using the colors of orange, red, yellow, white and clear glitter acrylic paint and the other with orange, red, brown, yellow and gold glitter acrylic paint. I also made another one using green, blue, yellow and white acrylic paints. 

I then used water colors to paint a blueish-purplish sky and a green bottom for the grass. While that was drying I cut out the petals of the flowers from the discs made with the salad spinner. I know the way I put the flowers together is not exactly the way the real flowers are, but it's just representational. 

I glued the flowers, trying to choose the prettiest petals for the top. I also used the disc with the blue, yellow, green colors for leaves.

I just adore the way the red flower petals came out with the streaks of white! And the different shades of green and yellow in the leaves is lovely as well. The Salad Spinner technique made it so easy. I never could have individually painted them like that, and you can see the glitter in the orange flowers. In real life they are even more amazing!


Once I had the flowers down I painted the stems, first using water color but they weren't noticeable so used a brown marker and then glued down the leaves. 

Then it was time to work on the title of the page which I titled Summer Fun. I used some cute little rubber stamps that my mom bought me for my birthday and an ink stamp with white ink. It was still hard to read so I used a white marker to fill in the letters. 

It was really hard to get the letters all in a row, so go with the flow right? I made them whimsical and not straight at all and then cut out the strip. These were stamped on another piece of the salad spinner paper that was mostly all orange, which is why I didn't use it on the petals.


I felt something was missing on the bottom right so I went through my stash of embellishments and found some hummingbird stickers and loved them because this plant does draw hummingbirds, probably because of the red in the plant. 


I used markers to make the dots in red, yellow and orange and then made a little border around the whole thing in blue and red. I just love putting a border on my pages because it makes it look so finished.

Slowly I am building up my "stash" of things to use in building these journal pages, and I'm finding such peace in doing them, it's so relaxing!

I made a few more discs of salad spinning art that I am saving to use for future projects, so you will probably see a lot more of this type of art...stay tuned!


Monday, July 10, 2017

Art Journal - Tougher than you may think

I mentioned in a previous post that I was looking into Art Journaling. I've been trying it out and I have to say that it is definitely harder than I thought it would be. 

When I sit down to blog the words just flow. I just sit and type. I don't worry about spelling or punctuation, I just get the words down. Then I go and search for images that I want to use in the post. I then read and re-read and make corrections. But the words, they do just flow! I often have to delete a bunch of stuff I wrote because I can be a tad wordy.

When I paint with Acrylics, I usually find an image or a tutorial that I want to paint and paint it. I find that predictable and easy to do.

But with mixed media art journals, you are supposed to let your creative juices flow and just do what comes naturally. Experiment, using different tools, think outside the box. Yeah...I'm not really an "outside the box" kinda girl. In grade school I always colored within the lines and then boldly outlined the lines!

But I'm trying...so I wanted to share some pages I've done. This is the first page I did. I've been dating them and this one was done on 6/18/2017.


The background was done using Oil Pastels which I rubbed on with my fingers. I loved blending these. The paint brushes I sketched myself and then painted them using Acrylic Paints. The Believe is a chipboard that I rubbed with purple oil pastels, the flowers and dots on the left are Gemstone stickers that self-glue to the page. then I added splashes of white again using acrylic paint. I used 4 different mediums. I was pretty happy with this one.

Now that I look at it, I see things I want to add or change, but my inner dominatrix that makes rules for me has already told me that once I date something, it's done...no changes. Poo!


This next one I was also pretty happy with and thought to myself, "Girl...you are one heck of an Art Journalist!" On this one I did the background using Dylusions Ink Sprays in Turquoise and Crushed Grape. I loved using this product and plan to start purchasing several other colors. 

I know that because I do the Iwanna Wednesday posts now and again, ya'll think I just run around willy-nilly buying myself whatever I want. But actually I'm pretty frugal and what I have I buy one at a time using the 40% off coupon from Michaels which means that I stop by  Michaels on my way home almost every day and buy only one thing, but you would be surprised how quickly things add up. (I also buy tons of things at the dollar stores!)


I also used Liquitex Modeling Paste and a Folkart Dot Stencil to create some dot textures. The dots reminded me of flowers so I added petals to them and the butterfly looks like he's flying through a field of flowers.

I was pretty proud of the butterfly too. I printed a butterfly on regular printer paper and then I took Washi tape and taped strips on the butterfly in a random design overlapping the edge of the butterfly and then just cut around the edges and Voila! Added a coat of Modge Podge to seal the top and it gave it a bit of a sheen. I did this one on 6/24/17. The little "Just Be" wording is actually the packaging on a pair of earrings that my mom purchased somewhere and the "Believe in Your Dreams" is a stamp from Michaels from their dollar bins when you are standing in line to pay.


So there's several mediums going on here, ink spray, modeling paste, stencils, stamps, marker pens, washi tape, Modge Podge. I can't even begin to count.


This next one was actually just me practicing along with a video tutorial on how to paint roses using water colors. First I prepared the page as I always do using white acrylic gesso. Then using modge podge I randomly glued some recycled cardboard packaging and gessoed over that to make it the same color as the background. 

then I tried to do a watercolor drip technique which didn't work well for me so I just water-colored the whole thing and then used this background to practice the water color roses, which came out more red than I wanted them to be so I tried to lighten them up with white acrylic paint and then finally just painted on some gold acrylic glitter paint. 


I added stems and leaves and then outlined the recycled cardboard with a graphite pencil and used my fingers to blur it to look like shading and added the black stamp on the side. I love the black stamp!

This next one I really don't like...yet... so I haven't put the date on it because I want to fix it, but don't know quite how.

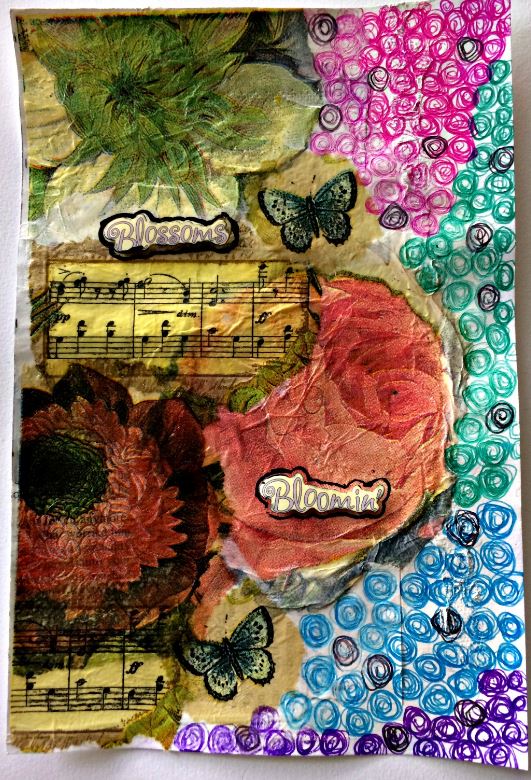
I used a beautiful paper napkin from several that I bought at the Dollar Store. I modge podged it on to the paper in strips of what I liked. Strips of the musical notes, the butterflies and the roses, and I left the right side of the page white, intending to do a quote or something. I don't know why I didn't do the quote because now that I look at it I can see the quote there. 


Instead I took some Paper Mate Ink Joy pens and doodled circles, which I had hoped looked like roses...I don't like them. I think I will just gesso over them and then I'll add a coat of unbleached titanium acrylic paint to cover the ink over and then I'll add a quote. I think that will make me happier. I'll also remove the stickers that say Blossoms and Bloomin'. I didn't like those either, too small. I'll probably have to add some more butterflies as I outlined the stickers in a black markers.

I have a couple more I want to share, but as usual this is getting wordy, so I'll stop for now and try to do another post over the weekend. I just want to say that trying to think outside the box is kicking my butt, but I think in a good way.