Saturday, August 13, 2016

The Piano Lives On - Class Art Project

As promised I want to share with you the Art Project that we did in a recent Art Class I took. 

Unfortunately I did not take a picture of the original project before we started. It didn't dawn on me that I would want to blog about it. Luckily once we got it primed I realized it would make a great blog post so I did take a picture of it after the class.


I had heard about projects like this where older pianos are painted and left in public places where people are invited to sit and play a tune. One of them is Play Me, I'm Yours. I was so excited to be a part of public art such as this!

My sister Lisa though was devastated! She felt that it was sacrilegious to take a beautiful old piano crafted by someone with love and just paint it, cover the old wood! She wouldn't even take part! She couldn't even watch!

The second week we applied the blue paints in different shades using different textures. I'll admit at this point I was starting to feel like Lisa because I wasn't thrilled with the way it was painted. I expect a bright sky blue and not the dark and light mixture...but I was willing to remain optimistic about it, but just barely. Lisa still couldn't even watch and she vocally was very opposed. She's such an old soul!


Here is a close up of the beautiful hand carved detail of the piano. I could see how Lisa would hate to see this covered up.


The next week our Art Teacher, Marcelo Rodriguez began sketching the almond branches and other artwork that was going to be on the piano.

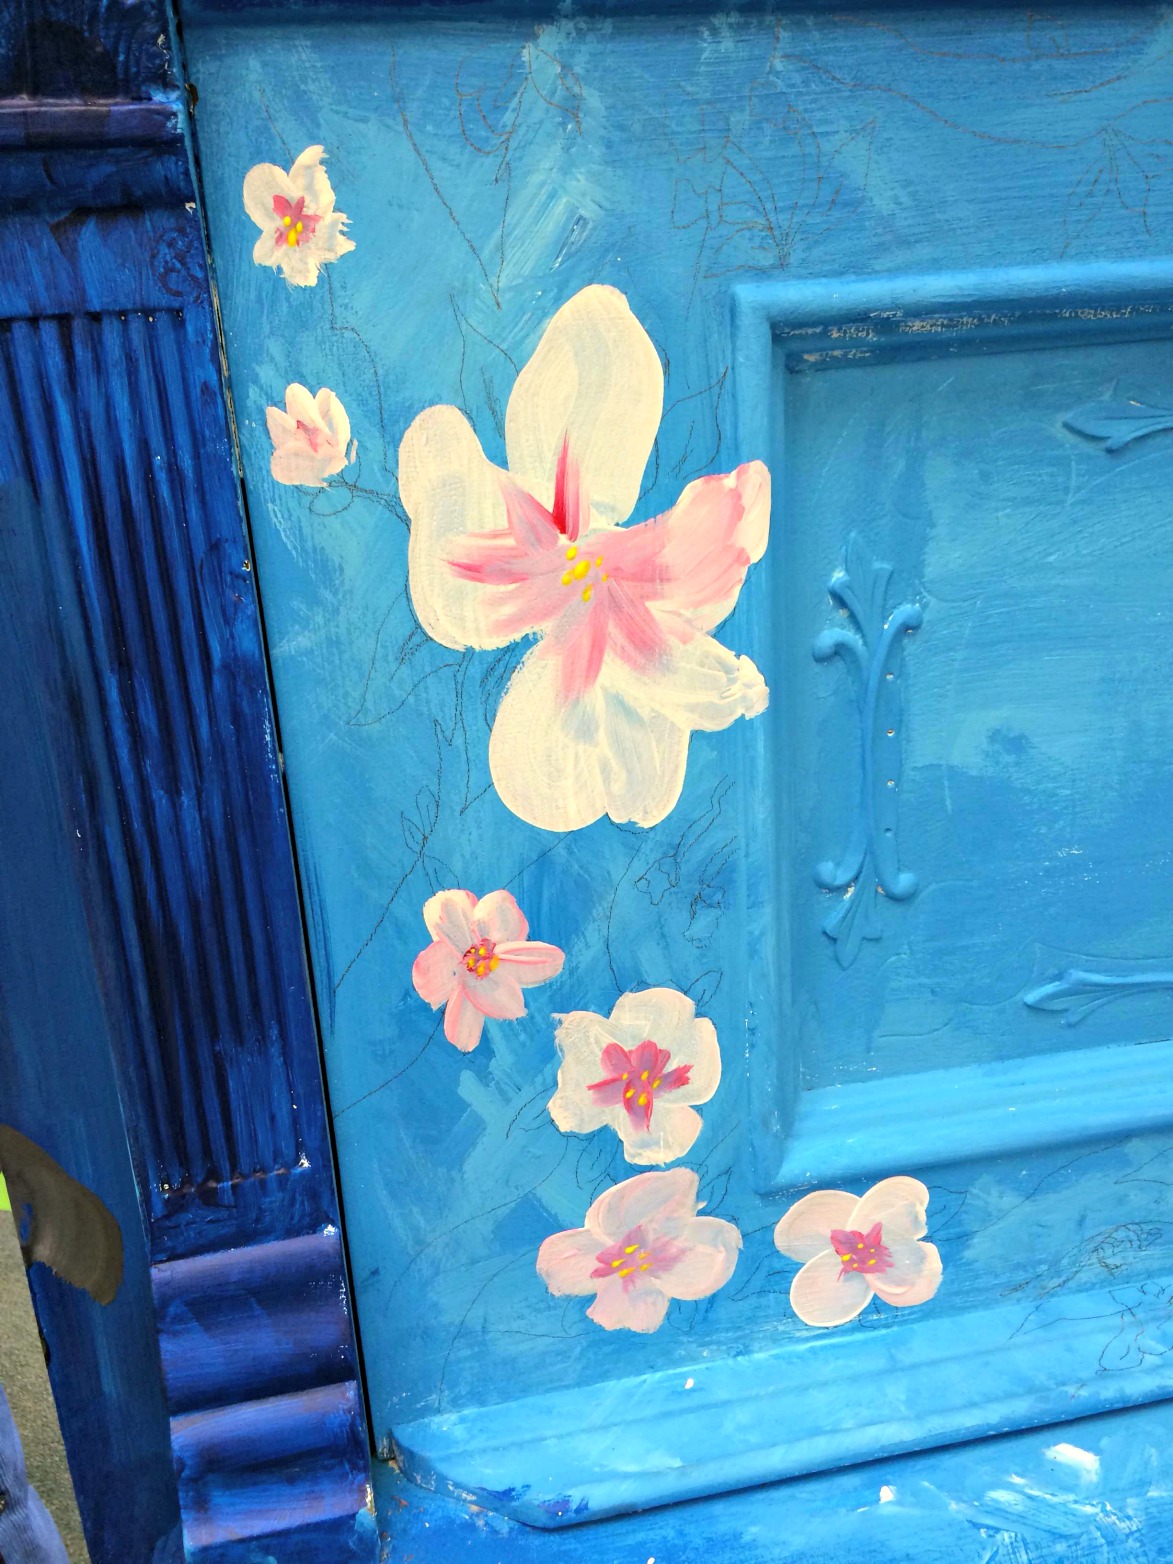
In this picture you can make out the rough pencil sketching that he was doing on the piano. He had a lot of faith that we, his beginning art students, could make magic out of those lines!


But here's Marcelo and he got the ball rolling by painting the branches on one side and some flowers and then he pretty much let us...his students do the rest!


Is that not gorgeous! It was amazing to watch him mixing the colors on a simple paper plate and have them turn into magic!


Even I got in on the action right away and anyone can tell you I've never thought of myself as having an artistic bone in my body! Here I am painting the almond blossoms themselves!


Here's a closeup of the almond blossom detail. See how they aren't perfect up close but step back a few inches and it just becomes perfection. You'll see in the end result.


While the rest of us continued painting branches and blossoms Marcelo used his artistic skills to complete the bottom and front of the piano.


See his palette is just a simple paper plate using just a few basic colors and Voila! Look what he created in just a few minutes while laying on the floor and the rest of us walking around him!


I didn't think it could be done, I didn't know how we were going to accomplish this project in time, but here it is at the Art Reception last week! And Lisa who was not on-board at the beginning even unknowingly matched her blouse to the piano...it was meant to be!


That next week the piano was moved to the Wasco Farmers Market with a sign on it that said "Public Piano - Be A Player" and people were invited to play it! I've put the link on here, but not sure if you will be able to see it since it's a Facebook video, but the lady playing is the manager of the farmers market. 

Isn't this just amazing? The piano has a whole new fresh look and now a whole new generation of piano players and music lovers will be able to share in the joy of this piano...that we painted! I'm in awe!


I can't wait to take beginning painting with Marcelo! If you have a local paint night in your area take it! You will find out how much fun this is, how relaxing and what a great sense of pride and accomplishment art can provide!


Tuesday, August 9, 2016

Another Jack of All Trades, Mistress of None Posts

I received a great response on my last blog post about my art class and final project. Maybe not in the comment section of my blog, but certainly on Facebook.

One of my most loyal blog readers (Thank you DUTA) made me stop to think about my artwork and other activities that I am involved in and I responded to her comment with this: 

"Thank you! Unfortunately as I've said before, I'm a Jack of All Trades, Master of None...or perhaps Mistress of none? 

I can cook, but not well enough to be a chef. I can write, but not well enough to author a book, I can dance, but not well enough to be on Dancing with the Stars, and now I can draw but alas...never enough to have my work displayed at an exhibition.

Now perhaps if I just narrowed down my list of activities and stuck with only one I could master that one, but I think I prefer being a Jack of All Trades and just moving around like a busy little bee!"

I do have many activities that I am a part of and enjoy but I've mastered none of them. I just flit about like a little busy bee from one flower to another. And you know what? It's ok...it makes me happy to be so-so at so many things!

Just last week I made Kabobs for the first time! Beautiful right? But I had to google a recipe, I can never just pull stuff out of thin air like I see them do on Master Chef. I'm a recipe girl, not a cook or chef.


I've also recently taken up line dancing and while I'm enjoying myself and I've taken line dancing before, I can actually only do the Mustang Sally! But I'm getting there.

You all know I blog and I've enjoyed my little blog for years and sometimes I go back and read something I wrote years ago and I think to myself "Wow, you're good!"  Yet I know I don't have a book in me, or even a How-To Manual, I'm just happy writing down things when I get inspired.

I've taken some pictures through the years that I've really loved, but I am far from being a great photographer! I can't even remember settings on my phone, let alone settings on cameras and lenses!

Here's a photo I especially love! It just seems very artistic to me and alive. There's joy and excitement in the photo and that is what appeals to me about great photographers; it's how I feel when I look at their pictures.


Here's another one of a Dahlia I grew last year. Again, I'm not a gardener but every once in a while I hit one out of the park and it actually grows!

The photo appeals to me because of the coloring, the blue background, almost looking like I caught the last of the sunlight when I took this photo. I feel peaceful looking at this, knowing there is so much beauty in such simple things.


I've tried lightening up the photo but I don't feel the same thing when I look at it with brighter lighting. When I look at this next picture it's just a pretty picture. What do you think?


Anyway, thank you DUTA for inspiring this post with your comment. I'm grateful for my faithful readers but would it kill ya to post a comment? I mean really??? Would it?  Hahaha! Truthfully, I live for comments!


Sunday, August 7, 2016

Why Art is Addictive and my New Obsession

I mentioned in a previous blog post I wrote on July 2nd that I was taking an art class and I posted this picture...


Can you believe that with a little perseverance and practise and time and the diligent instruction from my Art Teacher Marcelo that I was able to display this as my final Art Project at our end of class Art Reception?


I have to say I'm pretty damned proud of myself! This is my adaptation of a painting posted by a childhood friend of mine on Facebook who had visited the Hilbert Museum in Orange. Here's a photo of his of the actual painting and a short blurb about the artist Emil Kosa Jr. Thanks Jim Bronson for the inspiration!


I also displayed another drawing of bees that I did. This is probably my favorite of all the sketches that I did and the one I enjoyed the most while doing it. I just really loved them and they were so easy to draw.


I so enjoyed this class and was sad to see it end, but we can look forward to a Beginning Painting Class in September. In another post I'll share some of the art work of my fellow classmates and a special class project that we did.


Sunday, July 24, 2016

The Big 58! Inching towards the 60's

Well guess who celebrated a birthday this week?

This Girl!


Yep, me...me with that cheesy grin. Can you believe I'm 58 years old? It's hard for me to believe, in my mind I'm still in my early 30's, sometimes in my mind I'm still 18...but trust me, my body knows it's nearing 60! Those aches and pain remind me every day!

But it was a great birthday this year. It started out with a hug and birthday greetings from my mom who couldn't wait to give me my birthday gifts. She knows me so well and knows what I love!

A beautiful butterfly necklace and purse. I just love them! Thanks mom, you're the best and I love you!


Then I get to the office and my co-worker has all kinds of surprises for me. You can see in the first picture with the cheesy grin, all kinds of goodies! Starbucks coffee, my favorite, a beautiful blue creamer, sugar bowl and bowl that I love and she even made a special Lemon Cream Pie for me...low-carb!

Here's a close up of the dishware, I love them and her! Thank you Angelica! You're the best!


Later in the day I received this beautiful floral arrangement from my employers!


My wonderful sister Lisa put together a "girls" birthday celebration after work where family and friends got together to help me celebrate. With Margaritas, balloons, laughter and fun we had a great time!


It was a fun day and all the festivity made me feel like a kid again! Thank you all for sharing in this special day with me!


Sunday, July 10, 2016

Onion, Ham, Jalapeno and Cheese Frittata

July 7th was exactly one year that I have been on my low carb, high fat lifestyle and I've lost and maintained a consistent weight loss of 23 pounds. I was aiming for 1 pound a week which would have been 52 pounds, but I have to be realistic and realize that sometimes life happens and for one reason or another you can't stick to the plan. Don't fret and beat yourself up, just get right back up on that horse and keep on trucking! I know that is mixing up a couple of different quotes, but you get what I mean, you're a smart bunch!

In the spirit of my one year anniversary on LC/HF, I decided to share a great Frittata recipe! Cause why wouldn't I? I mean just look at this deliciousness!


I also love sharing recipes on my blog because that way I can always find the instructions on how to make something because I'm pretty forgetful!

So you start by melting 2 tablespoons of unsalted butter in a non-stick, oven safe pan. I used my cast iron pan which I love, love, love, but next time I will make sure to use it on a lower heat level. Once the butter is melted I toss in my diced onion and about a 1/2 teaspoon of salt and cracked pepper to taste. I just love the smell of onion caramelizing in butter, it makes my heart happy!


I cooked the onions...oh about 4 minutes, then added my chopped ham and diced jalapenos. I would have preferred to use red bell peppers but I didn't have any so I improvised. It's all my training from watching episode upon episode of Chopped and Iron Chef! I stirred and cooked that for about 2 minutes. 


While that was going on, I cracked 8 eggs in a bowl, added a 1/4 cup of half & half, but you can use milk if you so desire. I added a 1/4 teaspoon of salt and pepper and a dash of paprika and whisked the eggs. Then mixed in 1 cup of grated cheddar and I mixed in a bit of mozzarella as I didn't have enough cheddar to make up a cup. (Again, my Food Network Chef Training) See the little red flakes of Paprika in there? Yummmmm! Gives everything a great smokiness!


Now was the time to marry the ham, onion, jalapenos with the eggs and cheese and I said my blessings over them and they all became one with the world and it was beautiful!


So you gently stir to try to get all the ingredients uniform so they aren't all just clumped together in one spot and then you kinda leave them alone, see how they get along, for about 5 minutes. During this time you heat up your over broiler and then you place the whole pan under the broiler and you add a little heat to this beautiful marriage and see if they still blend beautifully even when things get hot! And they do and they did and it was good!


Wanted to cut into this right away but I know that patience is a virtue and so I covered it with foil and let it sit for about 5 minutes then turned it over onto a plate and then turned it over again onto another plate cause I wanted the pretty top to be showing. Then I cut into it!


And it was good and my heart was happy, especially after I paired that slice with my favorite low carb beverage.


So I enter into another year of low carb/high fat and here's to hoping I can lose another 23 pounds in the coming year.

RECIPE:   4 to 6 servings

  • 2 tablespoons unsalted butter
  • 1 large onion, diced (about a cup)
  • 3/4 teaspoon kosher salt
  • Freshly ground black pepper
  • Dash of Paprika
  • 8 large eggs
  • 1/4 cup Half & Half (you can use milk instead
  • 1 cup diced ham
  • 1 or two jalapenos, seeds removed and diced
  • 1 cup grated cheddar cheese
DIRECTIONS:
Melt butter in a medium, non-stick, oven safe skillet. Add the onions and season with 1/2 teaspoon salt and cracked pepper to taste. Cook, stirring often for about 4 minutes until the onion gets soft, then add the diced jalapenos and ham stir and cook 2 or 3 more minutes.

Crack the 8 eggs in a bowl, add the half & half (milk) add 1/4 teaspoon salt, paprika and pepper again to taste and whisk and pour into the pan over the onions, ham and jalapenos. Stir to make sure the fillings are evenly distributed and cook, stirring gently a couple of times during the first minute of cooking, and then let the mixture cook undisturbed until the eggs are just beginning to set, about 5 minutes.

Transfer the skillet to the oven and broil 3 to 5 minutes until the eggs are just set. Remove from the oven, cover with foil and let sit for another 5 minutes, then invert onto a plate, then invert again. Cut into wedges and serve warm. 


Saturday, July 2, 2016

I'm Taking An Art Class

One of the things that I've always wanted to do is to draw. Draw and play piano. Draw and play piano and sky dive, yep...those three things are what I have have always wanted to do.

I'll admit now that I've taken piano lessons. Years of piano lessons, and I can play a mean Yankee Doodle Dandy...but that is about it! For some reason I just cannot read music. I haven't given up yet, someday I hope to take lessons again.

As to skydiving, I should have done it back in the day before I developed a fear of heights, now I know it's one of those things that I will never try! I get anxious just standing on a hotel balcony!

That leaves drawing. I think this one is still doable! So I'm taking an Art Class with my sister and our friend Lupe. Wish me luck because I have never had an eye or an aptitude for drawing. 

One of the classes was on perspective, which is tough for me. When I was in high school I wanted to join the Air Force. I took the test and failed. I failed because of questions like this. Once the shape below is folded up, what will the end result be? Can you guess? Answer later on, let me know if you got it. I didn't!


That being said, I'm learning that even someone who has no natural born talent with drawing can still draw using simple techniques. 

One Point Perspective is one way. You can find an explanation and really great diagrams at this link. I will admit it still took me a while to understand this concept while my sister got it right away.

Here was my first attempt. It's not bad, but the couch cushions are wrong and it throws off the room a bit.


Then I went rogue and during the week, outside of class I watched some youtube videos and came up with this. I thought I was doing really well on this one, but can you see the BIG mistake?


This is a subway train, people are going to sit in the seats and the ones that can't find seats will hang on to the poles. You got that right? Well first look at the seats on the left, see how they are almost sitting on the floor? Imagine if you will, someone sitting there, they are going to have their knees up by their ears!

And the seats on the right, imagine sitting there. You would have to jump up there or get a boost from another passenger and even once you were seated your legs would hang about three feet above the floor! FAIL!

But what I lack in artistic ability I make up for in perseverance, so I tried yet another one and this one I think I nailed and my art instructor said this one was pretty good as well.

We'll just call this one the hall in the library because this is the longest room I've ever seen! I'll keep practicing and the great thing is that it's very soothing to concentrate on this and it relieves a lot of tension!


Another technique that we learned just this week is drawing objects using shapes. He's teaching us to see the shapes around us and using 4 simple shapes we can draw almost anything.

In the drawing below, I drew the 4 shapes free-hand, not using a ruler so don't worry that they aren't perfect because one of the things that I am having to learn with art is that it's not perfect and sometimes it's those imperfections that make things beautiful; cones, cylinders, circles and squares. 

He had us make this simple diagram using those shapes and what does this drawing bring to mind? If you said a lamp you would be correct. I need to practice drawing this one some more because I drew it too big. Once I get the perspective of how big it should be I can add detail and make it look like a lamp.


With that lesson in mind, I drew this cute little guy. Can you see the shapes? What he had us do first in pencil was to draw him in shapes, the head, ears, eyes of course are circles. His paws are cylinders, the base of the cup is a cone. Once the shapes were there we simply created the rest of him and then outlined him with a black Sharpie, erased the shapes and there he was!


I'm really enjoying this and hope to learn more techniques and eventually be able to accomplish this! I would love to paint this on one of the fences in my backyard, that would be amazing! And since Lisa and Lupe are taking the class with me they can come and help! There's a method to my madness!


So that's what I'm up to this summer! Oh and by the way, don't think I forgot...the answer to the diagram question above is A. Did you get it right?


Wednesday, June 1, 2016

Chicken Fajitas - Englishman Style!

I don't know why, but lately I've been on a cooking kick. Not a good time for a cooking kick since today and yesterday were our first full days of over 100 degree weather!

It's 102 outside right now! And I'm in here slaving over a hot stove...with an ice cold bottle of Michelob Ultra of course,! Hey, I don't have to suffer that much!


Yesterday I made some chicken and had three big breasts left over! Mom had gone shopping and found bell peppers on sale so she bought me 6! 3 Red and 3 Yellow ones and they were ripe! What to do with them, what to do?

I decided that I would make some Chicken Fajitas. You would think being that I am Mexican that it would be no problem, but I had never made Chicken Fajitas...so I went to YouTube and found a video by an Englishman by the name of Warren Nash.

Seriously! An Englishman from Nottingham, England who posted a video on how to make Mexican Chicken Fajitas with Mexican Mariachi music playing in the background! I fell in love with this guys accent and the way he said Oregano! So I followed his recipe. An Englishman taught this Mexican to make Fajitas!

First I prepped all my food. Chicken breast cut into strips, hence the name fajitas as fajitas is Spanish for strips. Then cut up onion the way Warren did it, then bell pepper.


While I was cutting up my veggies I marinated the chicken in a bowl with some Olive Oil, the juice of one lemon (I had no lime, sorry Warren), Cumin, Oregano, Salt and Pepper. I changed 2 things from Warrens recipe, I added no sugar since that adds carbs and I added the diced garlic in so that it would marinate with the meat.

Then it was time to get cooking! First I added Olive Oil to my favorite pan and added the onions. I stirred these lovelies for about 10 minutes. Oh the aroma!!!!


My poor mom came by to look in the pan and I told her, wouldn't you love to just put a spoonful of these in a torilla and just eat it? She HATES, DETESTS, DESPISES Onion! She looked at me like I was nuts and said "I wouldn't touch those things even with that wooden spoon!" I guess I don't have to share with her then, do I?

While they were caramelizing I decided to do something different from Warren, just cause I was feeling the Mexican blood boiling in my veins from the scent of the onions and I tossed in some chopped Jalapeno. Next time I'm leaving the seeds in!


I will tell you that at this point Warren adds the chicken. But maybe his chickens are not as juicy in Nottingham, England because I know now that at this point I would take the onions and jalapenos out of the pan and just saute the chicken alone in the drippings as it let out quite a bit of juice so the onions got more boiled than caramelized!


You can see that the onions are almost translucent in the photo above, I wanted them caramelized. But live and learn right? So I added the peppers and stirred and stirred, doesn't take long, maybe 10 to fifteen minutes since the chicken is sliced thinly into "fajtas"!

Voila! Chicken Fajitas as taught to me by Warren Nash, a Nottingham Englishman! Not bad for an Englishman and a Mexican right?


But no one had to teach me how to eat these babies! Just heated myself up a low-carb tortillas, added fajitas and guacamole...oh yeah, wait! I made guacamole. Just a simple one. Normally I add Jalapeno and Diced tomato but I wanted the Fajitas to be front and center.


Voila! Let's try this again, the finished product. Muy delicioso, Old Chap!